Saturday, September 11, 2010

Cup of Joe

Had a great time playing in Tulsa last night and I was able to slide by a certain Starbucks.
 Don't forget to order your tickets for the 2010 Breast Impressions Gala coming up on October 2 at the OU -Tulsa Schusterman Center. Get more info at http://www.breastimpressions.com/

Tuesday, September 7, 2010

On Display

The casts are on display in Tulsa and mine is hanging proudly honoring my survivor Karen, along with Artist Scott Johnson's for survivor Saundra at the Utica Square Starbucks. 
What, M.Y. Art TM is in a coffee shop? Shocking. 

Check out the rest of the casts in September including by the elevator on the upper level of Woodland Hills Mall; the food court of Tulsa Promenade; and both Marilyn Ihloff salons.

Monday, August 30, 2010

DONE!!

Don't scroll down and get a sneak peak. 
You have been with me from the start. So let's finish this off together.

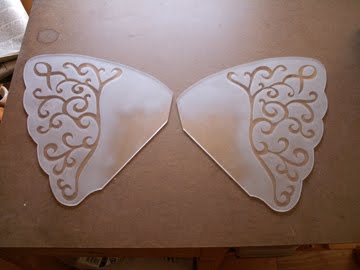
After cutting out the design, I used my pattern again to protect the back from the sand blasting.

What is it? Its my homemade sand blasting cabinet. I know it looks redneck, but it only cost $20 to make and it works. Stop laughing, lol

Wing inside the cabinet. Seriously, stop laughing, lol.

And after some time making a sand tornado in a box - Frosted acrylic.
Stage 3 DONE!
Assembly:

I measured 4 times and started drilling holes. 
This is a reenactment. I would never drill left handed.

Bolts and nuts. Slot A into tab B...

And now.....

drum roll.......

TA DA!!
I am very happy with the way it turned out. Based on some of the other finished casts, this looks to be the unofficial "Year of the Wings." I am so honored to have this displayed with the other great art pieces that I have seen so far. I also hope my wonderful lady who this represents likes it too.

Please check all of the finished casts out throughout Tulsa in the month of September. Also remember to follow Breast Impressions for more news on the gala Oct. 2nd and more upcoming events.

Thanks for following me on this journey, I hope you enjoyed it as much as I did.

Saturday, August 28, 2010

Stage 3 - Acrylic

Stage 1 (cast) and 2 (backdrop) are done. Just one more to go
The Acrylic! 
Why acrylic? For this piece I wanted a custom shape and I wanted it light weight for hanging on the wall.

I took the same pattern I used for the back drop and trimmed about 1 inch around for the new pattern.

Placed it on a nice sheet of 1/4" think acrylic.

2 outlines ready to be cut out.

For the acrylic, I use the big band saw.
The paper on the table is to eliminate scratching while I'm cutting and I can see my marks better. Dark marks on a dark table makes it tough.

And just like that, they are cut out. Spent some time sanding the edges to make them smooth. 

I took the pieces to the drafting table. I cover them with a clear vinyl covering.

I then copied the design on the vinyl. I take a sharp exacto knife and cut around the design, then remove the extra vinyl. 

Tomorrow is sand blasting and hopefully assembly! So close.

Thursday, August 26, 2010

Paint done

Finished up the second coat of the pink fine paint. I think the pink really pops.
I highlighted the tips of pink with white and the dark side with purple.
Here's a detail shot. Looks better in person, promise

The next step is the acrylic and then we can assemble. 
I'm starting to see the end and I cant wait to see how it all looks together.

2nd coat

Quick post. Worked 3 hours adding a 2nd coat to the pink line work.
A little detail shot. Ignore the pencil lines, lol

Wednesday, August 25, 2010

Picking up the brush

Ready for the hand painting
Everything is drawn out.
The pink is coming along well.
I would have never thought to paint brown and pink. But it looks good.
1st coat is done. It needs a couple coats and some fine line work. 
More to come